

Demystifying APIs: Build Your Own Password Generator
Creating a Custom Password Generator with APIs

I am a long-time video editor and producer turned software engineer. I like to write about career change, personal growth, and software development. I'm also a father of two amazing little boys and every once in a while, they let me play video games.
Introduction
Alright, you've heard of APIs, maybe you know what API stands for — Application Programming Interface, if you're curious — but what does that really mean? I'll explain it the way it was taught to me by Leon Noel at 100Devs:
An API is a simple interface for doing something complex.
Let's go a little further with an example, say, a TV remote.

A TV remote can turn on a TV. It can change the channel. It can increase and decrease the volume. It can even control your smart home if you want to get really fancy. But do you know how it turns on your TV?
No?
Me neither! And guess what? I don't really care that I don't know. If I tried to learn everything about everything, I would never have the time I need to learn the things that matter to me most. So thankfully, we have this interface (the remote) that does the heavy lifting for us. All we have to do is point it in the right direction and push the right buttons.
Let's Get Started
If that didn't sink in all the way just yet, don't worry. It might take some time and some more examples to really let it cement. In the meantime, let's build something together so that we can see an API in action.
Two quick notes before we start:
I would strongly suggest coding along and trying to "break" things in the code to make it your own.
For the more advanced learners, I do understand that there might be better ways to call an API. I'm using fetch() because this is how I learned it.
For this project, we're going to be using Fawaz Sullia's Passwordinator API. Take a moment and check out the readme file and see what you can understand from that, and then come back and we'll keep pushing.
\A quick note about this API in particular. I've noticed that the first time it is called, it can take some time to return a response. Please be patient...the code below works. :)*
HTML
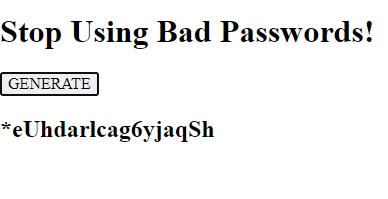
To start, set up an HTML boilerplate ('!' - Tab in VSCode) and add the following to the body.
<body>
        <h1>Stop Using Bad Passwords!</h1>

        <button>GENERATE</button>

        <h2></h2>

        <script type="text/javascript" src="js/main.js"></script>
</body>
Pretty simple, right? We have an h1 at the top of the page and a button that says "GENERATE". But what about that h2? That is going to be where the new password that we generate gets added to the DOM. Here's what our page looks like so far:

BEAUTIFUL! 😍
Now, the JavaScript...
Alright, now comes the hard fun part. I'm going to walk you through some of this, and then we're going to refer back to the readme from earlier (which I'm sure you read before, right?) and learn from that.
Let's start somewhere easy, like the <button>. Buttons get clicked, right? That's what they're there for. So, before we even think about what we want the button to do when clicked, let's just register the click itself. We can do that by adding an Event Listener to the button, like so:
document.querySelector('button').addEventListener('click', generate)
What this translates to is "Listen for when the generate <button> is clicked, then run the function generate." I could've named this function anything, but I chose to name it generate because that made the most sense to me.
So now, the next logical step would be to write the function generate(). We want this function to generate a new password. Luckily, we have an API to help us do that! But, how do we implement that API? Let's go to the documentation!

I'm going to write this code out as-is, we'll walk through each of the lines to fully understand it, and then we'll add to it.
\I'd like to make a quick note here and point out that the address on the top line sends you to herokuapp.com, whereas the bottom sends you to onrender.com. The herokuapp.com address is invalid, so I will be using the onrender.com address. Also, I will utilize all of the parameters given to generate an 18 digit password with characters, alphabets, uppercase letters and numbers, but we can dig into how to customize this a little later.*
function generate(){
  fetch('https://passwordinator.onrender.com?num=true&char=true&caps=true&len=18')
      .then(response => response.json())
      .then(data => console.log(data))
}
So, what's going on here? Let's break it down, line by line, and make a few adjustments as we go.
function generate(){
This is the beginning of the function named generate.
fetch('https://passwordinator.onrender.com?num=true&char=true&caps=true&len=18')
'fetch()' is a modern Javascript function used to make network requests (such as API calls). It returns a Promise that resolves to a Response object, which we can then extract data from, as you'll see in the next step.
If none of that makes sense, let's say that it "fetches" something from a given URL, and then allows you to extract data from that thing.
We copied this code from the docs, but I feel like we can simplify this code, and make it easier to reuse, if we assign the URL to a variable.
function generate(){
  const url = 'https://passwordinator.onrender.com?num=true&char=true&caps=true&len=18'
  fetch(url)
That feels so much better, doesn't it? Ok, moving forward!
.then(response => response.json())
The '.then()' method is used to handle the resolution of a Promise in Javascript. Here we see we are taking the Response object from 'fetch(url)' and extracting the JSON data that has been received.
.then(data => console.log(data))
The '.then()' method is used again, here to extract the data, which we then console log to see what we're working with. But we can do so much more with this data than just console log it, so let's create a little room here for some other things we can do with this data.
      .then(data => {
        console.log(data)

      })
That's better. Lastly, I'm going to add a '.catch()' method here to handle any errors:
.catch(err => {
          console.log(`error ${err}`)
      });
This will console log a message with an error if one should occur. It's more common to use '.catch()' rather than another '.then()' to handle rejected Promises.
Okay, let's bring it all together now. This is what your code should look like so far:
document.querySelector('button').addEventListener('click', generate)

function generate(){
  const url = 'https://passwordinator.onrender.com?num=true&char=true&caps=true&len=18'
  fetch(url)
      .then(response => response.json())
      .then(data => {
        console.log(data)

      })
      .catch(err => {
          console.log(`error ${err}`)
      });
}
Save and reload your page, and when you push GENERATE, here's what your console should look like (though it may take several seconds the first time):
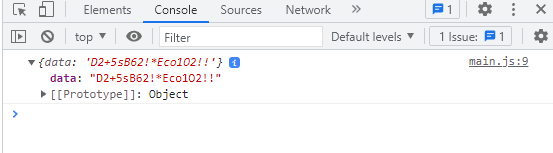
We just generated a password using an API! Now, if there were only some way to get this password to appear on the actual website we just built...
DOM DOM DOM!
Of course! The h2 HTML tags from earlier. Using dot notation, we can easily access the password in the 'data' object above. We'll add it to the DOM after our console.log (which we don't really need anymore, but I'll keep it for now).
.then(data => {
        console.log(data)
        document.querySelector('h2').innerText = data.data
      })
Here, we are accessing the h2 element, and using innerText to insert text into it. The text we're inserting — our password — can be accessed at 'data.data'. And, here's the result:
We now have a password generator that works! But it would be nice to add some more options.
Optional Options
If you're anything like me, you want some more functionality to this password generator. Luckily, we've all read the docs (!!!) and know that this is possible. So, let's get to work!
HTML...again
I wanted to first create some drop-down boxes for each of the customizations we could add. I'll skip the detailed explanation here and share the code, but I will add that it is very important to note what the <option value is assigned to. This is what will be pulled in on the JavaScript side, so paying attention to how it is written in HTML is essential. Alright, so here is the updated body:
    <body>

        <h1>Stop Using Bad Passwords!</h1>


            <label for="numbers">Include numbers?</label>
            <select name="numbers" id="numbers">
                <option value="yes">Yes</option>
                <option value="no">No</option>
            </select>

            <label for="chars">Include special characters?</label>
            <select name="chars" id="chars">
                <option value="yes">Yes</option>
                <option value="no">No</option>
            </select>

            <label for="caps">Include caps?</label>
            <select name="caps" id="caps">
                <option value="yes">Yes</option>
                <option value="no">No</option>
            </select>

            <label for="length">Length?</label>
            <select name="length" id="length">
                <option value="7">7</option>
                <option value="8">8</option>
                <option value="9">9</option>
                <option value="10">10</option>
                <option value="11">11</option>
                <option value="12">12</option>
                <option value="13">13</option>
                <option value="14">14</option>
                <option value="15">15</option>
                <option value="16">16</option>
                <option value="17">17</option>
                <option value="18" selected>18</option>
            </select>


        <button>GENERATE</button>

        <h2></h2>

        <script type="text/javascript" src="js/main.js"></script>
    </body>
And here's what that looks like on screen:

Lovely.
Back to JavaScript
Of course, none of these customizations do anything yet, because we haven't updated the JavaScript. We know (from reading the documentation) that these customizations are appended to the end of the API call, so it's probably a good idea to create a variable that can be appended to the end of the API call, and then manipulate that variable using another function. Let's call that variable 'choices'.
function generate(choices){

  const url = `https://passwordinator.onrender.com?${choices}`
  fetch(url)
      .then(response => response.json())
      .then(data => {
        console.log(data)
        document.querySelector('h2').innerText = data.data
      })
      .catch(err => {
        console.log(`error ${err}`)
    });
}
As you can see, I changed the assignment of const url to a template literal and appended 'choices' to the end. I also included 'choices' as a parameter for our generate function, as we will need to pull choices from somewhere else.
Okay, moving forward, this is probably too much to think about at once, so let's write some pseudo-code and see where that gets us first.
document.querySelector('button').addEventListener('click', generate) //we cannot call generate yet, as we haven't defined our choices. This eventListener should call something else

//we need to build our variable 'choices' based off of the different parameters that were selected in the drop-down boxes. Maybe this is a function that can be called on click instead of generate?

//we should define 'choices' at the top of this new function (buildChoices()) as an empty string, so that it is reset each time the function is run

//within buildChoices(), we should call different functions to get the actual choices themselves (getNumbers, getChars, etc...), to avoid using the function for more than one operation.

//after our choices have been defined and appended to the 'choices' variable, we need to call the generate function with choices as an argument
function generate(choices){

  const url = `https://passwordinator.onrender.com?${choices}`
  fetch(url)
      .then(response => response.json())
      .then(data => {
        console.log(data)

      })
      .catch(err => {
          console.log(`error ${err}`)
      });
}
We have to do a couple of things here before generate() can run.
Call a new function with the eventListener, buildChoices, instead of generate
Define the variable 'choices' as an empty string
Call functions for each customization to determine if the customization is to be used or not. For a function like getNumbers(), it would look like this:
 function getNumbers(){

    const numbers = document.querySelector('#numbers')
    const numbersChoice = numbers.value
    return numbersChoice
 }
If the choice is 'yes', append it to the variable 'choices' in buildChoices(). Note that for getLength(), this will be different, as it is not a 'yes' or 'no', but a value that we are appending.
Finally, call generate(choices).
I'll share the code at the end, but take some time and try to work through it on your own before checking the answer.
Conclusion
Thanks so much for sticking with me through this, and I hope it was helpful in getting started with APIs. Of course, there's still a lot more we could do with this, so I'll ask three things before posting my final code. For any one of these, please comment on the blog or reach out to me on Twitter.
If you can think of ways to further optimize this, please share! I am by no means an expert and I'd love to learn.
Related to #1, if there are any ways I could have explained this code better (or if I didn't explain something correctly), please let me know so that I can fix it!
If you do build this out, I'd love to see the creative ways you can style this with CSS. It's beyond the scope of this tutorial, but I can only imagine the fun ways someone could stylize a password generator, and I'd love to see what you come up with!
Without further delay, my final code:
document.querySelector('button').addEventListener('click', buildChoices)


function buildChoices(){
  let choices = '' //reset choices on click

  const numbersChoice = getNumbers()
  if (numbersChoice === 'yes'){
    choices += 'num=true'
  }

  const charsChoice = getChars()
  if (charsChoice === 'yes'){
    choices += (choices !== '' ? '&' : '') + 'char=true'
  }

  const capsChoice = getCaps()
  if (capsChoice === 'yes'){
    choices += (choices !== '' ? '&' : '') + 'caps=true'
  }

  const lengthValue = getLength()
    choices += (choices !== '' ? '&' : '') + `len=${lengthValue}`

  generate(choices)
}

function getNumbers(){
   const numbers = document.querySelector('#numbers')
   const numbersChoice = numbers.value
   return numbersChoice
}

function getChars(){
  const chars = document.querySelector('#chars')
  const charsChoice = chars.value
  return charsChoice
}
function getCaps(){
  const caps = document.querySelector('#caps')
  const capsChoice = caps.value
  return capsChoice
}

function getLength(){
  const length = document.querySelector('#length')
  const lengthValue = length.value
  return lengthValue
}

function generate(choices){
  const url = `https://passwordinator.onrender.com?${choices}`
  fetch(url)
      .then(response => response.json())
      .then(data => {
        console.log(data)
        document.querySelector('h2').innerText = data.data
      })
      .catch(err => {
        console.log(`error ${err}`)
    });
}
And if you're still here, I'd like to once again shout out Fawaz Sullia for creating this API, and Leon Noel for being one of the best instructors I've ever had. If you're interested in pursuing a career as a software engineer, I cannot recommend 100Devs enough. It is truly a life-changing experience. Please feel free to reach out to me if I can be of any assistance, or just to connect!


